Lemon Yellow Squash Whoopie Pies
This post contains affiliate links. As an Amazon Associate I earn from qualifying purchases. We may earn compensation when you click on the links at no additional cost to you.
It’s one of the most exciting times of the year around our house! (Sadly, no it’s not Christmas yet. That is THE most exciting time of the year around here.) The garden is beginning to overflow with all the fruits of our labor. And one thing we don’t seem to be lacking this year is yellow squash. Rather than let it go to waste, I decided to use my family’s love of whoopie pies to sneak in some veggies to come up with this delicious treat!

Holy moly! This was the haul of yellow squash after I came in from the garden the other day! We’ve had it fried a few times since it started coming off, but let’s admit it, you can only eat it fried so many times.
Since it was a Thursday afternoon, the boys were begging me to take them up to the local drink station for a drink and a whoopie pie. That has been our ritual since we’ve been quarantined at home. It gives us something to look forward to each week. I’ve drastically cut down on going anywhere since all of this virus stuff began. We have way too many people in our family who are high risk that we enjoy visiting for us to risk it. And like the rest of us, the boys like getting out of the house, and grocery pick up, just doesn’t cut it for them. So as the boys were begging to go get a drink, I decided that we would forgo the drink station whoopie pies, and we would try our hand at making our own instead. What we came up with, met their approval, my husband’s approval, my co-worker’s approval, and his co-worker’s approval at lunch the next day. So you know it’s good!
One larger yellow squash will give you about 2 cups of shredded yellow squash. So if you end up with two cups, just double the recipe I’m giving you. That’s what I ended up doing because I know these babies won’t last long around my house of hungry boys!
Step 1
Preheat your oven to 350 degrees. Slice the ends off your yellow squash. Then chunk it into cubes if you have a food processor that will shred (total life saver by the way…if you shred things a lot or do a lot of canning, then I’d highly recommend looking into buying a food processor). If you don’t have food processor that shreds, then peel your squash and shred it.


Step 2
Shred your yellow squash.

Step 3
Add 4 eggs to your yellow squash.

Step 4
Add 1/2 cup of vegetable oil.

Step 5
Add 1 1/3 cups of sugar.

Step 6
Mix until well blended.

Step 7
Add 1/2 cup of buttermilk. (I didn’t have buttermilk, so I easily created it at home. I just added a tablespoon of white vinegar to 1 cup of milk. I let it sit for 10 minutes, then I measured out the 1/2 cup.)

Step 8
Add 2 tablespoons of lemon juice.

Step 9
Add 2 tablespoons of lemon peel.

Step 10
Add 2 cups of flour.

Step 11
Add 1/2 teaspoon of salt.

Step 12
Add 2 teaspoons of baking powder.

Step 13
Blend everything on low speed just until mixed.
Step 14
Spray your whoopie pie pan. (If you let your 7 year old try to grease it, he will use way too much and then you will have a very greasy whoopie pie tin. See the top right tin for what I’m talking about. Haha!)

Step 14
Fill your whoopie pie pans about 1/4 cup full of batter. If you overfill these, you will have a giant burnt mess in the oven. Trust me.

Step 15
While these bake, line the counter with foil so these can cool once they come out of the oven.

Step 16
Bake at 350 degrees for 12-13 minutes or until a golden yellow color.

Step 17
Prepare the cream cheese icing once these are completely baked and cooled. Here are the directions for the icing: Mix one 8 ounce package of room temperature cream cheese with 1/2 cup of room temperature butter. Slowly add 2 cups of powdered sugar. Mix well. Add 1 teaspoon vanilla. Beat together.
Step 18
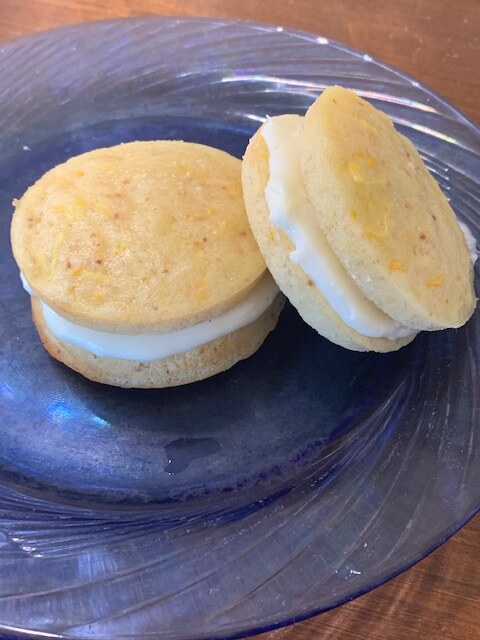
Spread cream cheese icing on each half of the completely cooled whoopie pie. Then top with other half of whoopie pie. Repeat until all whoopie pies are iced and together.

Step 19
Enjoy with a glass of ice cold milk.
Don’t let all of the steps scare you. This recipe does come together pretty quickly.
Since these are made with cream cheese, they need to be stored in the refrigerator.
I can’t wait to hear what you thought if you made these. Feel free to let me know in the comments.
Lemon Yellow Squash Whoopie Pies
Ingredients
- 1⅓ cup sugar
- 1/2 cup vegetable oil
- 2 eggs
- ½ cup buttermilk
- 2 tbsp lemon juice
- 2 tbsp lemon peel
- 2 cups all purpose flour
- ½ tsp salt
- 2 tsp baking powder
- 1 cup yellow squash
For the cream cheese frosting
- 1 8 oz. package room temperature cream cheese
- ½ cup room temperature butter
- 2 cups powdered sugar
- 1 tsp vanilla
Instructions
- Preheat oven to 350°.
- Grease whoopie pie pan.
- Shred yellow squash.
- Measure out 1 cup yellow squash.
- Add 2 eggs to yellow squash.
- Add ½ cup vegetable oil.
- Add 1 ⅓ cups sugar.
- Mix until well blended.
- Add 2 tbsp lemon juice.
- Add 2 tbsp lemon peel.
- Add 2 cups flour.
- Add ½ tsp salt.
- Add 2 tsp baking powder.
- Mix on low.
- Pour ¼ cup of batter into grease whoopie pie pan.
- Bake at 350 ° for 12-13 minutes or until done.
- Cool completely.
For the cream cheese icing:
- Blend 1 (8 oz.) package at room temperature cream cheese with ½ cup at room temperature butter.
- Gradually add 2 cups powdered sugar.
- Beat until light and fluffy.
- Beat in the vanilla.
- Spread over ½ of cooled whoopie pie.
- Place other ½ of whoopie pie on top of iced ½.
- Enjoy!
it looks so yummy… Its nice that this recipe have Squash makes it so healthy 🙂
Thanks! It’s certainly a great way to sneak vegetables in.
These sound delicious!
Thanks! They are so good.
These look so good and I love the idea of taking something sweet for the kids and adding in vegetables. I love that you have a vegetable garden. This year we started our first flower garden. Next year I want to try a vegetable garden.
Oh, I LOVE flower gardens, Therese! I’d love to see a picture of yours. Flower gardens are just as relaxing for me as vegetable gardens.
What a great idea! Would have NEVER thought of this but love it!
So glad you enjoyed reading about it, Jamie!
Original use of squash!
Thanks, Leslie!